First job on the list was to remove the front seats which I'm taking over to The Trimming Centre in Hove tomorrow to be fully overhauled. Already managed to scratch a wheel arch trying to get the seats out with the car in the garage

Next job was the bonnet. I have removed the bonnet in preparation for respraying it but first I have removed the bonnet scoop which I'm taking down to Autopaints in Brighton to have the colour matched in 2 Pack base.

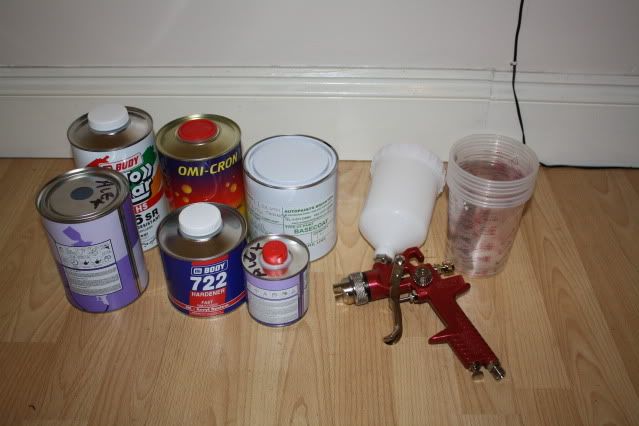
Had a spend up at Autopaints. Don't have a clue what to do with it all but I'm sure I'll learn LOL
HVLP Spray Gun
2K Base
Universal thinners
2K Clear coat
Activator
Filler primer + activator
Mixing cups

I've got a Clarke Hunter 55 which is probably a bit small for serious spraying but should be OK for doing the odd panel. I've given it a bit of a try and you just need to be a bit patient with it and not rush.

I got my seats back today. I have to say im very pleased with them, they look like new. They both had a couple of panels replaced then they were re-bolstered and filled. It cost £405 to get done which sounds expensive and it is but it's not like you can go out and buy a pair of original ERA seats so you just have to pay the money! The picture doesn't really do them justice, they look great. You really see the difference when you compare before and after.


Filled bonnet

And sprayed in 2K primer filler ready for wet flatting

Base coat

I let the 2K primer dry for 24hrs before wet flatting with 800 grit wet and dry. The 2K primer seemed a lot harder to rub down than the stuff you get out of a rattle can. I carefully spirit wiped the bonnet and tried to make sure there was no dust in the air but I still managed to get all sorts of crap in the base coat. I can see why the pro's use a booth now.

Clear coat. I made the fatal error of thinking "Ill just give it one more coat" moments later it's got more runs than the West Indies cricket team

An action shot Angie took LOL

I spent about 4 hours wet flatting and compounding the bonnet yesterday to get all of the runs out and it's turned out pretty well. Started out with 800 wet and dry then worked up to 1500 before using rubbing compound and T cut. All by hand and oh my god was it hard work LOL


Refitted the seats too

What next then? I need to start on the front parts of the body kit but I think my hands have done about as much rubbing down as they can do this year. Might play with some oily bits instead.
Phase 2 begins. The plan is to remove the front bodykit sections which also include the side skirts and repair the damage caused by years of close calls with high kerbs. I also want to see what the condition of the bodywork and sills are like behind the fibreglass kit.
With the bodykit removed I was pleased to find original sills still in very good condition. There are a couple of smalls areas of rust around where the fixing screws have been drilled into the sills. Two of the fixing screws rounded off so I had to resort to the trusty old angle grinder.

O/S/F corner, again in pretty good condition for a 20 year old mini. While I've got the kit off im going to replace the front teardrop subframe bushes and fit poly ones as they are almost imposible to replace once the kit is back on.

O/S/F wheelarch. You can clearly see the original side repeater hole and the extra lip welded on the arch to mount the bodykit

Jacking point, unique to an ERA as the bodykit gets in the way of the original jacking point

Here's the bodykit section waiting to be repaired. It looks OK in the pics but when you look closer the paint is cracked and the front is covered in stone chips. This is the better side of the two sections.

Just got to pull my finger out and get stuck in now. There is quite alot of prep work to be done


